Setting up a home studio for music production is all about creating a dedicated space where your creativity can flow freely. To do this effectively, you’ll need to choose the right location, invest in essential equipment, and optimize your workspace for sound quality. This guide will walk you through the key steps to establish a music production environment that inspires and enhances your artistry.
Choosing the Right Space

The first step in setting up your home studio is to identify a suitable space. Look for a quiet area in your home that minimizes external noise. Ideally, a room located away from busy streets or common living areas will provide a more conducive atmosphere for recording and mixing. Additionally, consider the size and shape of the room; a rectangular room with a higher ceiling often works best for sound dynamics. If you have the flexibility, a basement or an attic can serve as excellent options due to their natural isolation from household noise.
It’s also essential to think about the room’s natural lighting and how it makes you feel. A bright, airy space can inspire creativity, while a darker, cozier environment might help you focus. Whichever you choose, ensure it’s a place where you can spend extended periods without feeling cramped or distracted.
Essential Equipment for Music Production

Once you’ve chosen your space, the next step is investing in quality equipment that will elevate your music production. Start with a good audio interface, which is crucial for converting your analog sound into digital audio. Look for interfaces with low latency and high-quality preamps, such as the Focusrite Scarlett series or the PreSonus AudioBox.
Studio monitors are another vital component of a home studio. They provide a more accurate sound representation than regular speakers, allowing you to hear your tracks as they truly are. Brands like Yamaha, KRK, and JBL offer great options for different budgets. Don’t forget a pair of high-quality headphones—closed-back models are perfect for tracking, while open-back headphones are better suited for mixing. The Audio-Technica ATH-M50x or the Beyerdynamic DT 770 Pro are popular choices among music producers.
Lastly, consider adding a MIDI keyboard to your setup. A MIDI controller can significantly enhance your workflow, giving you the ability to create and manipulate sounds easily. Look for one that fits your space and provides the features you need, such as pads, knobs, and sliders.
Acoustic Treatment
To achieve the best sound quality in your home studio, investing in acoustic treatment is essential. Start by using soundproofing materials like foam panels, bass traps, and diffusers to reduce echoes and improve sound clarity. Foam panels can be strategically placed on walls and ceilings to absorb sound waves, while bass traps can help manage low frequencies in the corners of the room.
Additionally, consider incorporating rugs and curtains into your design. Thick rugs can dampen sound reflections on hard floors, while heavy curtains help block out external noise and minimize echo. If your budget allows, you might even explore DIY options for acoustic treatment, such as building your own panels or using bookcases filled with books as makeshift diffusers.
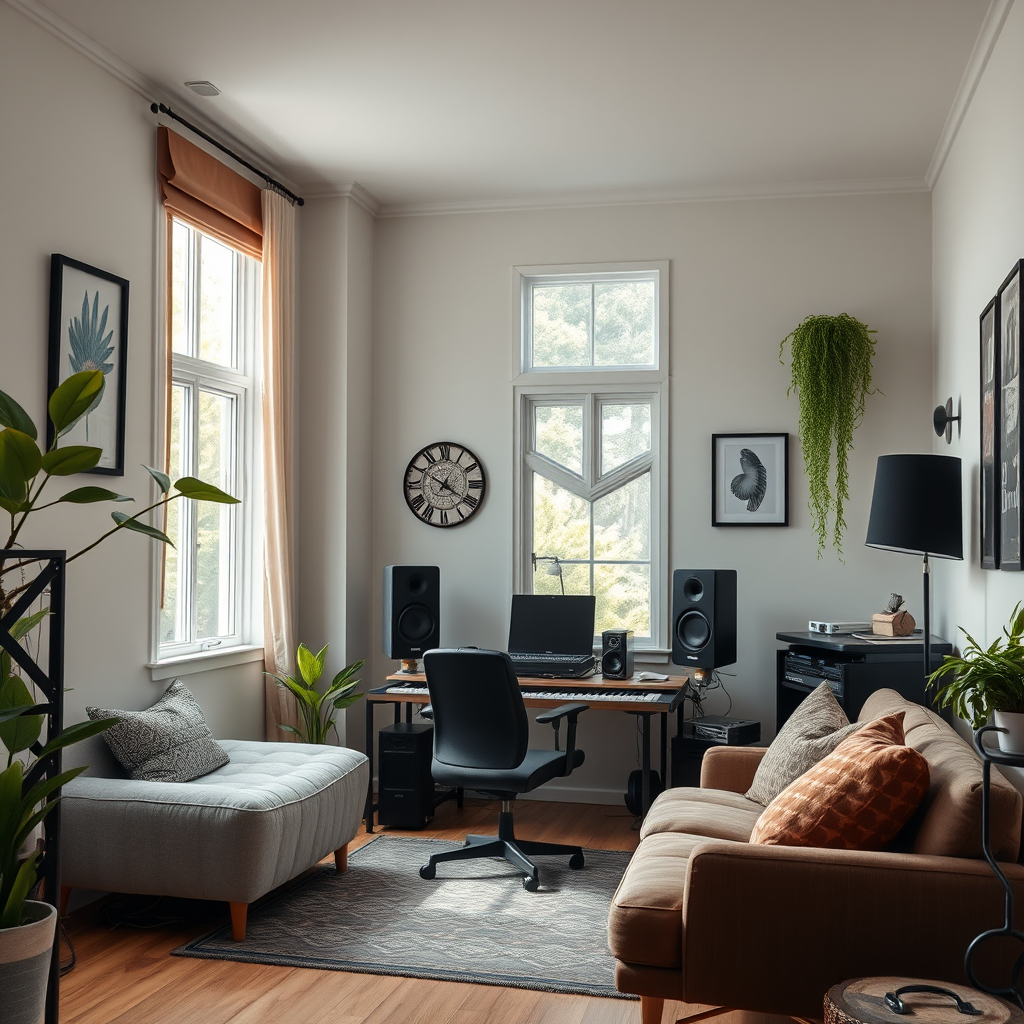
Setting Up Your Gear
Now that you have your equipment and acoustic treatment, it’s time to set up your gear efficiently. Organize your workspace so that frequently used equipment, like your audio interface and MIDI keyboard, is within easy reach. This setup not only enhances your workflow but also minimizes the time spent fumbling around during the creative process.
Proper cable management is also crucial. Use cable ties or sleeves to keep your cords organized and avoid clutter. This helps prevent tripping hazards and makes your studio look professional. Consider labeling cables to easily identify which is which, especially if you have multiple devices connected.
Don’t forget to arrange your monitors in an equilateral triangle position with your listening position at the apex. This arrangement ensures that you receive the best sound quality by allowing you to hear a balanced mix.
Software and DAW Selection
The next major step is selecting the right Digital Audio Workstation (DAW) tailored to your workflow and style of music. Popular options like Ableton Live, Logic Pro X, and FL Studio each have their unique features and workflows. Take advantage of free trials to test them out before making a commitment.
Once you’ve chosen your DAW, it’s time to familiarize yourself with plugins and virtual instruments that can enhance your production capabilities. Many DAWs come with built-in instruments and effects, but exploring third-party options from developers like Native Instruments or Waves can unlock new creative possibilities. Look for plugins that suit your genre, whether you’re in electronic music, rock, or hip-hop.
Recording Techniques
As you start recording, it’s essential to learn about microphone placement and recording techniques for various instruments. For instance, placing a microphone too close to a guitar can create unwanted bass buildup, while too far away can result in a thin sound. Experiment with different placements to find what works best for each instrument.
When recording vocals, consider using a pop filter to eliminate plosive sounds and ensure clarity. Additionally, don’t hesitate to experiment with different recording settings, such as gain levels and room acoustics, to capture the best sound quality. The more you practice and familiarize yourself with these techniques, the more confident you’ll become in your recording abilities.
Mixing and Mastering Basics
Mixing and mastering are critical stages in the music production process. Start by understanding the fundamentals of mixing, such as balancing levels, panning, and applying EQ to enhance your tracks. There are countless resources available online, including tutorials and courses, that can help you learn these skills.
When it comes to mastering, familiarize yourself with techniques that help finalize your tracks for distribution. Simple actions like limiting, compression, and adding stereo width can make a significant difference in how your music is perceived. Tools like iZotope Ozone provide a comprehensive suite for mastering music, making it easier for beginners to achieve professional-sounding results.
Creating a home studio for music production can be an exciting venture that enhances your musical creativity. By following these essential steps—from selecting the right space and equipment to understanding recording and mixing—you’re well on your way to producing high-quality music. Start planning your setup today and unleash your musical potential! Remember, the journey of music production is as rewarding as the final product, so enjoy every step along the way.
Frequently Asked Questions
What equipment do I need to set up a home studio for music production?
To set up a home studio for music production, you’ll need a few essential pieces of equipment. Start with a computer that has sufficient processing power and RAM for music software, along with a digital audio workstation (DAW) like Ableton Live or Logic Pro. Additionally, invest in a quality audio interface for better sound input and output, studio monitors for accurate audio playback, and a good microphone for recording vocals or instruments. Lastly, don’t forget headphones for monitoring and room treatment materials to enhance acoustics.
How can I acoustically treat my home studio?
Acoustically treating your home studio involves using materials to minimize sound reflections and improve sound quality. Start by identifying reflective surfaces and placing acoustic panels or foam on walls to absorb sound. Bass traps can be added in corners to manage low-frequency buildup. Additionally, consider using diffusers to scatter sound waves, creating a more balanced listening environment. Proper treatment helps ensure your music production mixes translate well across different playback systems.
Why is it important to have a good audio interface for music production?
A good audio interface is crucial for music production because it significantly improves sound quality and recording capabilities. Unlike built-in computer sound cards, a dedicated audio interface offers high-quality preamps, lower latency, and better A/D conversion, which is essential for capturing and playback of audio with fidelity. This equipment allows for multiple input and output options, making it easier to connect various instruments and microphones to your setup, ultimately leading to a more professional-sounding production.
What is the best DAW for beginners in music production?
The best DAW for beginners in music production largely depends on personal preference and the types of music you want to create. However, popular choices include GarageBand for Mac users due to its user-friendly interface and free availability, and FL Studio for its intuitive workflow and versatile features. Both DAWs offer a range of tutorials and community support, making it easier for newcomers to learn the basics of music production and start creating music right away.
Which monitors should I choose for my home studio?
When selecting studio monitors for your home studio, consider factors like size, budget, and room acoustics. Popular options for beginners include the Yamaha HS Series and KRK Rokit monitors, known for their clear sound and affordability. It’s essential to choose monitors that provide a flat frequency response, allowing you to hear your mixes accurately. Additionally, check the size and power of the monitors to ensure they fit your space and can deliver the volume you need without distortion.
References
- Record producer
- https://www.berklee.edu/news/berklee-today/2020/home-studio-setup
- https://www.soundonsound.com/techniques/setting-home-studio
- https://www.musictech.net/guides/buyers-guide/home-studio-guide/
- https://www.npr.org/sections/allsongs/2020/04/14/817036263/tips-for-setting-up-your-home-recording-studio
- https://www.grammy.com/news/how-set-your-home-studio-recording-gear-setup
- https://www.musicbusinessworldwide.com/how-to-set-up-your-home-studio/
- https://www.audiomicro.com/blog/how-to-set-up-a-home-studio/