
To add a mesh node, pair a compatible unit with your existing mesh system using its setup app, then position it within strong signal range of another node. If your mesh network works well but leaves a coverage gap, adding a node is a better first move than replacing the system. This guide explains how to check compatibility, connect the node, and place it for reliable coverage.


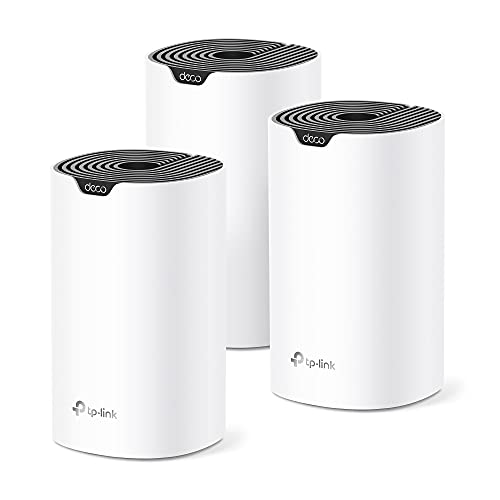

To add a mesh Wi-Fi node, confirm that it supports your existing mesh system, power it on near the main router, and use the system’s app or management interface to add it. Once pairing finishes, move the node somewhere it still has a strong connection to the existing network, then check coverage. The exact setup controls depend on your manufacturer and model.
This guide is for anyone expanding an existing home mesh Wi-Fi network. If you are setting up your first mesh system, configure the main router before adding another node. The instructions below use TP-Link Deco as a setup example, with Google Nest hardware included to illustrate compatibility differences.
Check That the Node Works With Your Mesh System

A mesh node must belong to a supported mesh family—not simply share a brand name or Wi-Fi standard with your router. Check the exact model and hardware version before purchasing or pairing.
– Identify both devices. Find the model numbers on their labels or in the management app. TP-Link documents compatibility between Deco models, but a TP-Link Archer router is not automatically part of a Deco mesh.
– Check setup requirements. Review firmware requirements, supported operating modes, and account access. For Deco, have the Deco app and the TP-Link ID authorized to manage the existing network.
– Confirm the device’s role. A standalone router, range extender, and mesh node are not interchangeable unless the manufacturer explicitly supports that configuration.
Matching Wi-Fi standards do not establish mesh compatibility; the manufacturer must support the specific devices working together.
Google Nest Wifi Pro cannot join the same mesh network as Google Wifi or the earlier Nest Wifi router and point.
The table highlights practical differences. “Ethernet backhaul” means using a network cable for the connection between mesh devices rather than a wireless link.
Mesh Compatibility and Ethernet Connections by Model
| # | Model | Compatible Mesh Family | Gigabit Ethernet Ports | Ethernet Backhaul |
|---|---|---|---|---|
| 1 | Google Wifi | Google Wifi / Nest Wifi, excluding Pro | 2 | Supported |
| 2 | Nest Wifi router | Google Wifi / Nest Wifi, excluding Pro | 2 | Supported |
| 3 | Nest Wifi point | Google Wifi / Nest Wifi, excluding Pro | 0 | Not supported |
| 4 | Nest Wifi Pro | Nest Wifi Pro only | 2 | Supported |
| 5 | TP-Link Deco M5 | TP-Link Deco | 2 | Supported |
| 6 | TP-Link Deco X20 | TP-Link Deco | 2 | Supported |
| 7 | TP-Link Deco X55 | TP-Link Deco | 3 | Supported |
According to TP-Link’s Deco X55 specifications, each X55 has three Gigabit Ethernet ports. According to TP-Link’s Deco M5 specifications, each M5 has two. According to Google’s Nest Wifi specifications, the Nest Wifi point has no Ethernet ports. These manufacturer specifications inform this 2026 guide; verify your regional hardware version before buying.
Power On and Pair the New Node
Pair the new mesh node through the existing network’s management interface. Do not create a separate network unless the manufacturer’s instructions require it.
– Power up nearby. Place the node near the main router for setup, unless directed otherwise. Use its specified power supply and wait for the documented setup-ready indicator.
– Start discovery. In the Deco app, select the existing network, tap +, choose Add a Deco Unit, select the model, and follow the prompts. Labels can vary by app version.
– Confirm completion. Wait until the app lists the node as connected. A power light alone does not prove successful pairing.
A mesh node is successfully paired when the network’s management interface confirms that it has joined the existing system.
Previously configured mesh hardware may require a factory reset before joining another network.
For a used node, follow its official reset instructions rather than guessing a button sequence. Resetting the main router instead of the new node can erase the working network’s configuration.
Move the Node and Check Its Connection
Place the node where it can receive a reliable upstream connection while extending coverage toward the weak area. For wireless backhaul, putting it directly inside the dead zone usually defeats the purpose.
– Choose an open location. Try a shelf or table between strong coverage and the problem room. Avoid enclosed cabinets, large metal objects, and unnecessary wall crossings.
– Check connection quality. Inspect the node’s signal or connection indicator where available. Then test the previously weak area using the same phone or laptop before and after relocation.
– Consider Ethernet backhaul. For Deco in router mode, a supported arrangement is modem → main Deco → switch → satellite Decos. Do not connect satellites to a switch upstream of the main Deco.
A wireless mesh node needs a usable connection to another mesh device, not merely proximity to the room needing coverage.
Ethernet backhaul removes the wireless link between connected mesh devices, but it does not increase the internet plan’s speed.
Use a repeatable before-and-after check: keep the test device, location, and test service consistent, then check browsing, video calls, and local connectivity—not just a speed-test result.
What Can Go Wrong During Setup
Most setup failures involve compatibility, discovery, placement, or network topology. Identify the failing stage before resetting equipment or buying another node.
– The node is not discovered: Recheck compatibility, power, proximity, app permissions, and the documented pairing procedure. Confirm that the app is managing the correct network.
– The node joins but coverage remains poor: Move it closer to another mesh device and inspect its upstream connection. A connected node can still have an inadequate backhaul link.
– An existing router complicates the network: Follow the manufacturer’s router-mode or access-point-mode guidance. Two routing devices can create double NAT—two layers of network address translation—which may complicate inbound connections and gaming.
Successful pairing does not guarantee a strong backhaul connection or improved coverage.
Changing a mesh system to access-point mode can remove routing features, so operating-mode changes require a feature check first.
With Deco, access-point mode leaves routing to the upstream router. Review TP-Link’s operating-mode documentation before changing settings, particularly if you rely on parental controls, port forwarding, or address reservations.
Decide Whether Another Node Is the Right Fix
Add another mesh node only when a genuine coverage gap remains and a suitable connection point exists. More nodes are not automatically better.
- Adding a node: benefit
- Extends usable coverage into rooms that existing mesh devices cannot adequately serve.
- Adding a node: limitation
- Wireless backhaul consumes radio airtime; additional overlapping devices can increase contention.
- Repositioning existing nodes
- Can resolve a placement problem without purchasing hardware.
- Fixing the internet connection
- Addresses service faults that another mesh node cannot repair.
An additional mesh node can improve coverage without improving the speed of the internet connection.
Mesh roaming depends partly on client-device behavior; adding a node does not guarantee immediate switching between access points.
Skip the purchase if coverage is already adequate or performance is poor even beside the main router. Check the incoming connection and existing placement first.
Save This Setup Checklist
Complete these checks before deciding whether the expansion worked. Judge success in the room that needed improvement, not only in the app.
– [ ] Confirm model compatibility, setup requirements, and access to the management app or interface.
– [ ] Pair the node, confirm it appears in the network, and move it to a suitable location.
– [ ] Check connection quality and test the previously weak area before deciding whether more changes are needed.
A complete mesh expansion includes compatibility verification, successful pairing, and testing after final placement.
Recording the node’s model and final location makes later network troubleshooting easier.
Sources to Consult for Your Specific System
Use official documentation for the exact model and hardware revision. For a 2026 installation, also check current app instructions because menu labels and available features can change.
– TP-Link: [Deco compatibility guidance](https://www.tp-link.com/us/support/faq/2248/) supports mixed-Deco compatibility; [adding another Deco](https://www.tp-link.com/us/support/faq/1590/) supports pairing instructions.
– TP-Link: [Ethernet-backhaul FAQ](https://www.tp-link.com/us/support/faq/1794/) explains supported wiring; [access-point-mode instructions](https://www.tp-link.com/us/support/faq/1433/) explain operating-mode changes.
– Hardware specifications: Official pages for [Deco M5](https://www.tp-link.com/us/home-networking/deco/deco-m5/#specifications), [Deco X20](https://www.tp-link.com/us/home-networking/deco/deco-x20/#specifications), and [Deco X55](https://www.tp-link.com/us/home-networking/deco/deco-x55/#specifications) support Ethernet-port counts.
– Google: [Google Nest Help](https://support.google.com/googlenest/) provides official Google Wifi, Nest Wifi, and Nest Wifi Pro compatibility, specifications, placement, mesh-test, reset, and wired-connection documentation.
– Model-specific details: Consult the device’s official support-page manual for status indicators and reset procedures.
Manufacturer compatibility documentation takes precedence over assumptions based on branding or Wi-Fi generation.
Reset procedures and status-light meanings must be checked against the exact mesh-node model.
Adding a mesh node comes down to compatibility, successful pairing, and sensible placement. Start with your manufacturer’s instructions, connect the node, and verify that it improves the area that needs coverage before adding anything else.
Frequently Asked Questions
What is a mesh node and why do you need to add one?
A mesh node is a device that joins a mesh network and helps extend coverage by relaying data between nodes. Adding a mesh node can improve Wi‑Fi signal strength in dead zones, increase network reliability, and reduce congestion on a single router. It’s especially useful in larger homes, multi-floor buildings, or areas with thick walls.
How do I add a new mesh node to my existing Wi‑Fi system?
Start by placing the mesh node within range of your main router or primary mesh unit, then power it on. Open the mesh app (or web setup page), choose “Add Node” / “Set up new device,” and follow the on-screen prompts to pair it with your network. Once the app confirms it’s connected, move the node to your desired location and re-check the connection quality.
How can I troubleshoot when my mesh node won’t connect during setup?
First, confirm the node has power and that you’re using the correct Wi‑Fi credentials or network name in the mesh app. Restart both the primary mesh unit and the new node, and try again while the new node is still close to the router to rule out weak signal. If it still fails, check for firmware updates, ensure the device mode is compatible (mesh vs access point), and verify there isn’t a MAC/parental control or security setting blocking enrollment.
Which is the best placement for a mesh node to get strong coverage?
Place your mesh node in a central location between the main router and the area with poor signal, ideally where it can maintain a strong backhaul connection. Avoid putting the node behind large metal objects, inside closed cabinets, or in direct interference hotspots like microwaves or thick concrete corners. If your system supports it, use an Ethernet backhaul by connecting the node to a wall port for more consistent performance.
What’s the best way to verify that the mesh node is working properly after installation?
After pairing, use the mesh app to confirm the node shows an “online” status and check its connection strength or backhaul quality indicators. Run a speed test on the far side of the network to ensure the improvement you expected—lower latency and higher throughput. If performance is still poor, try relocating the node a few feet to find a spot with better signal and re-run the placement or connection check in the app.
📅 Last Updated: October 16, 2026 | Topic: How to Add a Mesh Node | Content verified for accuracy and freshness.
References
- Mesh networking
- Wireless mesh network
- Overview
- Testing to determine if you are a bot!
- Testing to determine if you are a bot!
- https://pubmed.ncbi.nlm.nih.gov/?term=wireless+mesh+network+join+node
- https://scholar.google.com/scholar?q=add+mesh+node+to+wireless+mesh+network Google Scholar
- https://scholar.google.com/scholar?q=Thread+network+commissioning+joiner+node Google Scholar
- https://scholar.google.com/scholar?q=Zigbee+mesh+network+joining+device+join Google Scholar


One thought on “How to Add a Mesh Node”